English
  日本語
日本語  العربية
  Deutsch
  Español
  Français
  한국어
한국어  Português
  Татар теле
  Русский
 A fitted wardrobe can cover an entire bedroom wall and still feel difficult to use. Clothes gather on chairs, folded items slide into the wrong shelves, and the drawers that should hold daily accessories become too full too quickly. The problem is rarely the wardrobe size alone. In many projects, the real problem is that style decisions were made before storage behavior was understood.
That is why fitted wardrobe design planning should start with storage, not style. Door finish, panel texture, handle detail and lighting all matter, but they work best after the internal zones, usable depth, site conditions and drawings are clear. A calm wardrobe front is only successful when the inside supports daily use.
Quick Answer: What Should Fitted Wardrobe Design Planning Start With?
Start with the items that need to live inside the wardrobe. Before choosing a door profile or finish sample, list the clothing types, hanging length, drawer needs, folded items, accessories, luggage and seasonal storage. Then turn that list into cabinet zones.
A practical fitted wardrobe plan usually moves in this order:
- Clothing habits and storage volume
- Long hanging, short hanging, drawers, shelves and upper storage
- Usable internal depth and cabinet height
- Ceiling, wall, skirting, socket and clearance conditions
- Door type, finish, handles and lighting
- Front elevation, internal elevation, sections and installation notes
This sequence helps prevent one of the most common fitted wardrobe problems: the wardrobe looks good from the front, but the inside does not match how the room is used.
Start with clothing habits, then plan cabinet zones
A wardrobe layout should reflect real routines. Someone with many shirts and jackets needs a different hanging plan from someone who stores more knitwear, bags or folded trousers. A hotel wardrobe, a compact apartment wardrobe and a villa master bedroom wardrobe may all use floor-to-ceiling cabinetry, but their internal priorities are not the same.
Choose finishes and handles only after the layout works
Finishes and handles should support the layout, not replace it. A linen texture panel, mirror door, framed door or leather pull handle can refine the design, but these details cannot fix poor drawer placement, shallow hanging space or doors that block access.
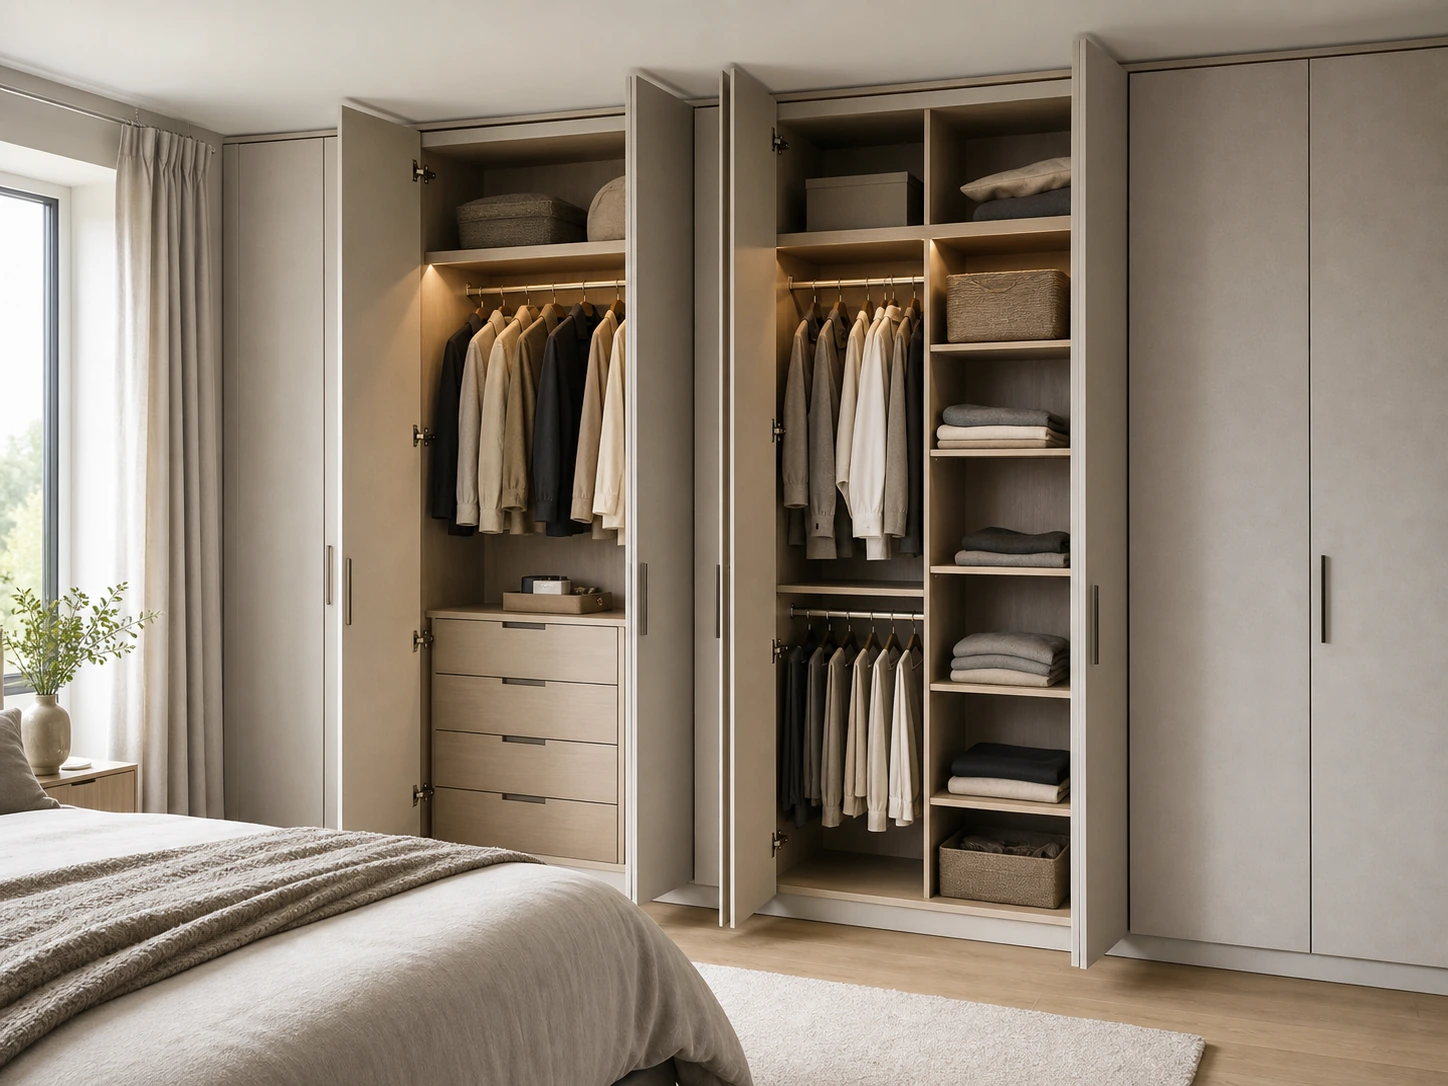
Why a Large Fitted Wardrobe Can Still Be Hard to Use
A large wardrobe can fail when it is planned as a front view instead of a storage system. The elevation may look balanced, but daily use depends on what is behind each door.
Size does not solve poor hanging and drawer planning
More cabinet volume does not automatically create better storage. If long dresses are forced into a short hanging zone, if shirts share space with heavy coats, or if small accessories sit on deep shelves instead of in drawers, the wardrobe will feel disorganized even when it is physically large.
The first question is not “How big can the wardrobe be?” It is “What needs to be reached every day, what needs occasional access, and what can sit higher or lower?”
Daily access matters more than a perfect front view
A fitted wardrobe often looks clean because the front panels hide everything. But the daily access pattern still matters. Frequently used clothing should sit between comfortable shoulder and waist height where possible. Seasonal storage can move to higher shelves. Heavy items should not be placed where they are awkward to lift. Drawers should open without clashing with bed frames, bedside tables or door swings.
This is where fitted wardrobe design planning becomes more than decoration. It becomes a way to match cabinet structure to the way people actually dress, store and maintain the room.
Start With a Clothing Audit Before Drawing the Wardrobe
The most useful fitted wardrobe drawings begin with a simple audit. It does not need to be complicated, but it should be specific enough for a designer or manufacturer to translate into cabinet zones.
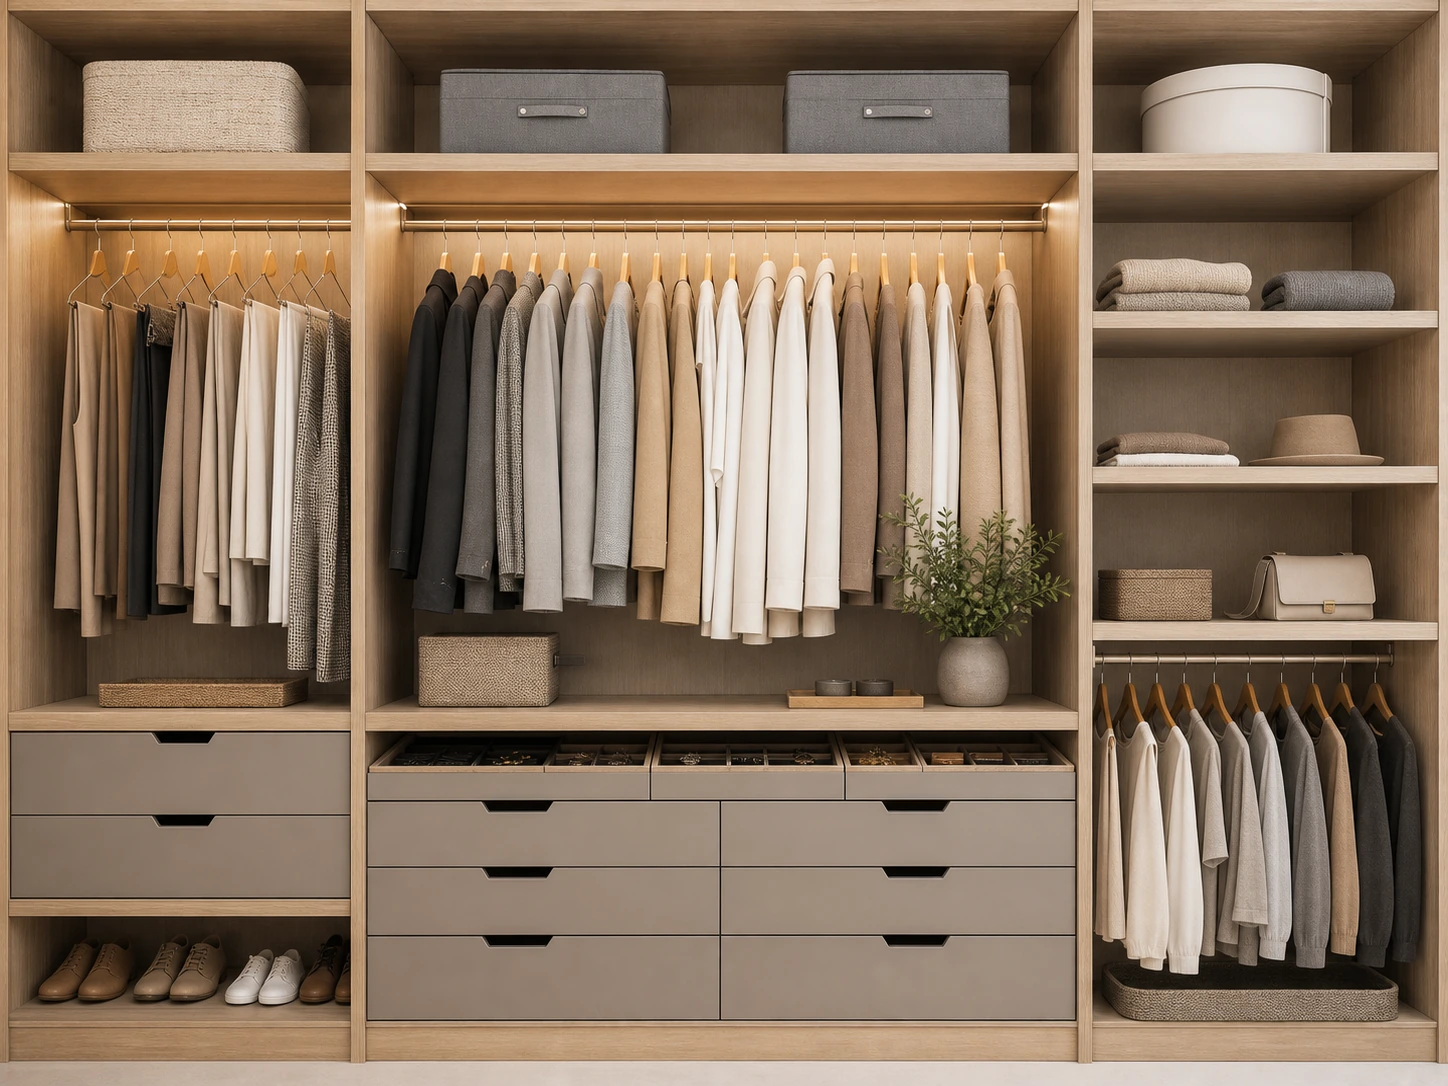
Separate long hanging, short hanging and folded clothing
Long hanging is for coats, dresses, robes and other items that need vertical clearance. Short hanging is for shirts, jackets, blouses, trousers on hangers and daily outfits. Folded clothing may need shelves or drawers depending on how often it is used.
If the wardrobe has only one general hanging area, the storage plan may become inefficient. A better layout often uses different hanging heights and separates daily garments from formal or seasonal clothing.
Count drawers, shelves and accessory trays by daily use
Drawers are valuable because they control small items. Underwear, socks, belts, scarves, watches and jewelry are easier to manage in drawers or trays than on open shelves. Shelves work well for folded sweaters, handbags, storage boxes and occasional items, but deep shelves can become messy when used for small daily pieces.
When planning drawer quantity, consider what should be visible, what should be hidden, and what needs fast access in the morning. A wardrobe with fewer but better-positioned drawers can feel more useful than a larger cabinet filled with generic shelves.
Keep seasonal and rarely used items away from prime zones
Prime storage zones should be easy to reach. These zones belong to daily clothing and frequently used accessories. Seasonal bedding, luggage, spare blankets and rarely used items can move to upper cabinets or less accessible side sections.
This zoning approach helps a fitted wardrobe stay organized after installation, because the most active items are not competing with items used only a few times a year.
Turn Clothing Habits Into Real Storage Zones
After the clothing audit, the next step is to turn behavior into cabinet structure. This is where the plan becomes more useful than a mood board.
Daily clothing zones should be easiest to reach
Daily zones should be placed where doors open easily and where the user does not need to stretch, bend deeply or move other items. For a shared wardrobe, each person may need separate daily zones so that one side does not become a mixed storage area.
In hotel or rental projects, the logic may be different. The wardrobe may need clear hanging, suitcase storage and open shelves for short stays. For a private bedroom, the layout may need more drawers, accessory storage and seasonal capacity.
Upper storage, lower drawers and side zones need different roles
Upper cabinets are useful for less frequent storage, but they should not hold heavy items that are difficult to lift down. Lower drawers can work well for accessories or folded pieces, but they need enough clearance to open fully. Side zones may suit long hanging, ironing boards, bags or vertical storage, depending on room width and door type.
The goal is not to fill every possible panel. The goal is to give every zone a job.
Leave space for future changes instead of filling every panel
A wardrobe planned too tightly may feel efficient on paper but rigid in real life. Clothing volume changes, seasons change, and users often adjust storage habits after moving in. Some adjustable shelves, flexible hanging areas or open sections can help the wardrobe adapt without requiring a full redesign.
Confirm Usable Depth, Height and Site Conditions
The outside depth of a fitted wardrobe is not the same as usable internal depth. Door type, panel thickness, back panel, hardware, lighting and internal accessories all affect what can actually fit inside.
Internal depth matters more than outside cabinet depth
Hangers, folded clothing and drawer boxes need usable space. If the internal depth is too shallow, clothing may rub against doors or sit at an angle. Sliding doors and hinged doors can also affect access differently. A design that works for one door system may not work for another.
Before production, the drawing should show the planned depth clearly enough for the buyer, designer and manufacturer to understand how the wardrobe will function.
Ceiling height, filler panels and tall door stability affect the final design
Floor-to-ceiling wardrobes need careful height planning. Ceilings may not be perfectly level, and installation often requires filler panels or adjustment space. Very tall doors may also need suitable hardware planning, hinge quantity or structural consideration so that the final cabinet remains aligned and serviceable.
These details are not decorative, but they influence the finished look. A clean ceiling line depends on measurement, filler design and installation planning.
Check skirting, sockets, wall flatness and door clearance early
Site details can change the wardrobe design. Skirting boards may affect how the cabinet meets the wall. Sockets may need to remain accessible. Uneven walls may require adjustment panels. Hinged doors need swing clearance, while sliding doors need track planning and enough overlap.
For overseas custom projects, clear site photos, wall measurements, ceiling height and floor plan notes help reduce confusion before production drawings are finalized.
Manufacturer note: A front elevation shows how the wardrobe looks. Internal elevations, sections and installation notes show whether the wardrobe can be built and used as intended.
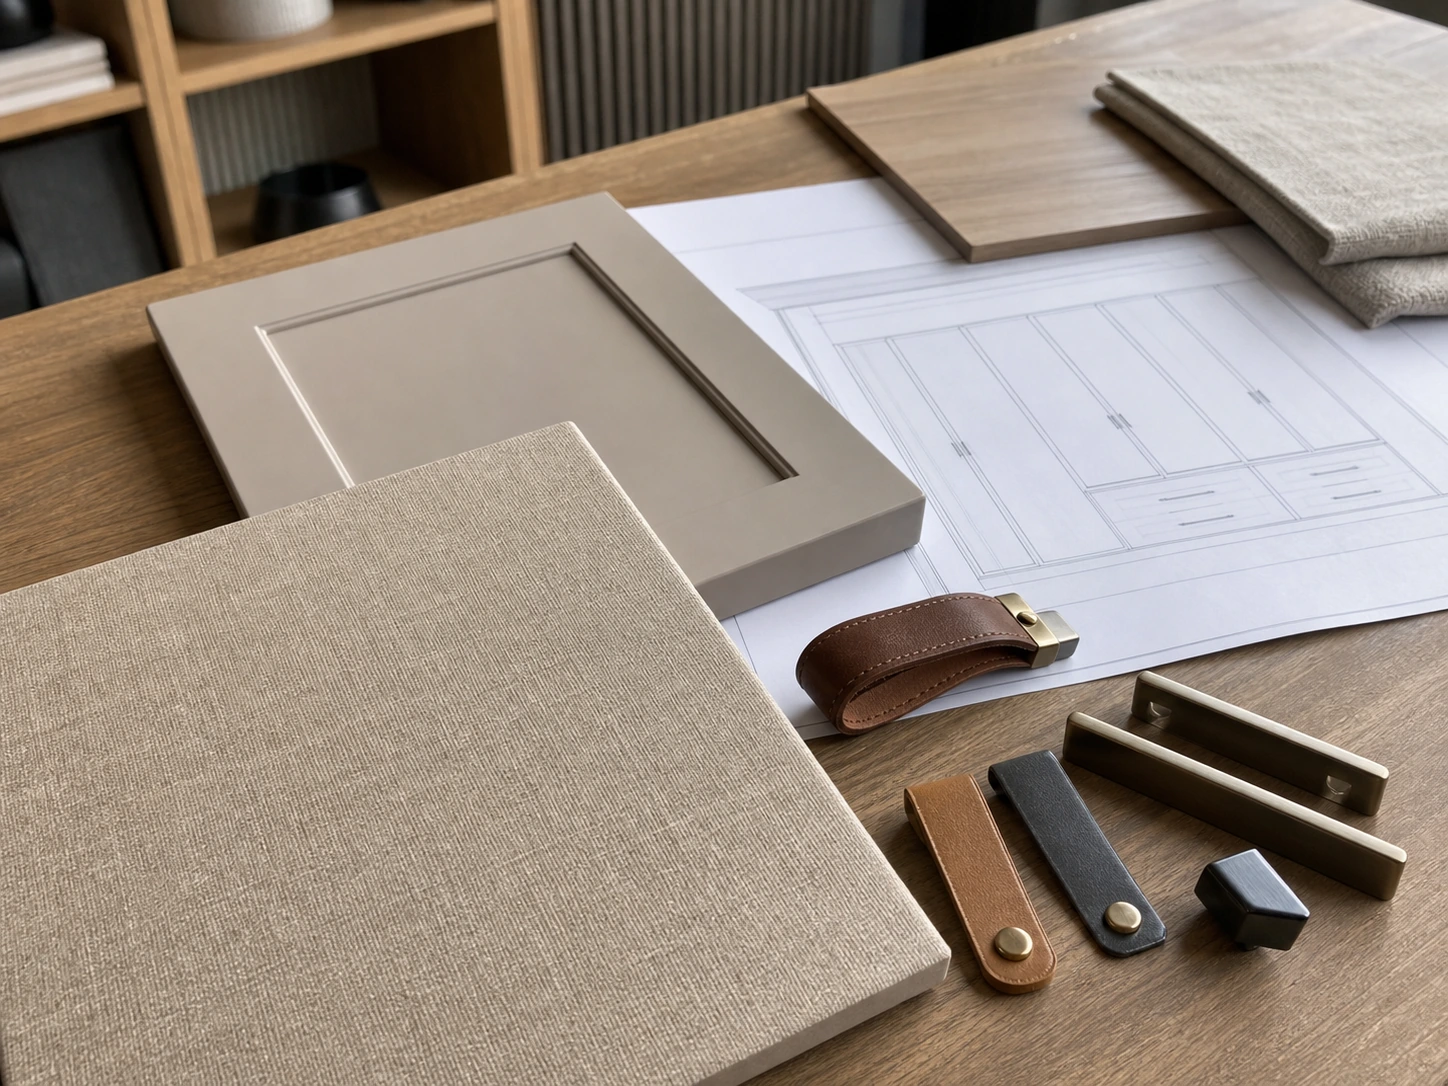
Choose Doors, Finishes and Handles After the Layout Works
Doors and finishes are important, but they should come after the internal structure. Once the storage plan is clear, style choices become more accurate.
Door type should follow access, clearance and room width
Hinged doors offer full access to each section, but they need swing space. Sliding doors save room in narrow bedrooms, but they expose only part of the wardrobe at one time. Mirror doors can brighten a bedroom, while flat or framed panels may create a calmer wall surface.
The right door choice depends on room width, bed position, walkway clearance and how often each section needs access.
Linen finish panels and leather pull handles work as style details, not the starting point
A softer textured surface can suit a bedroom wardrobe when the room needs warmth without heavy wood grain. Leather pull handles can add a quiet tactile detail when the door proportions and daily access pattern already make sense. For example, a linen finish fitted wardrobe with leather handles can be a useful reference when discussing soft panel texture and understated bedroom styling.
The key is sequence. These details should refine a working layout rather than distract from storage problems.
Match finish choices with bedroom, apartment or hotel wardrobe context
A private bedroom may allow a warmer finish and more personal details. A compact apartment may need lighter surfaces, mirror panels or sliding access. A hotel wardrobe may need a more durable, easy-to-maintain finish and a simpler internal layout for guest use.
Finish selection is strongest when it responds to the room type and the storage plan together.
Plan Lighting, Ventilation and Maintenance Access
Lighting and maintenance details should be planned while the wardrobe is still being drawn. They are harder to correct after installation.
Sensor lighting helps dark wardrobe corners only when wiring and placement are planned
Sensor lighting can make a deep wardrobe easier to use, especially in darker bedrooms or tall cabinets. But lighting needs a realistic location, power route and service access. If the light is placed where clothing blocks it, or if wiring is not coordinated early, the result may be less useful than expected.
Door alignment, dust gaps and cleaning access should remain serviceable
Wardrobe doors need adjustment over time, especially in busy rooms or project environments. Tracks, hinges and pull details should remain reachable. Gaps should be controlled enough for a clean look, but not planned so tightly that installation or maintenance becomes difficult.
Ventilation should also be considered where the room is humid or where clothing may be stored for long periods. The article should not make one universal rule for every climate, but the design should allow the project team to discuss moisture, airflow and maintenance before production.
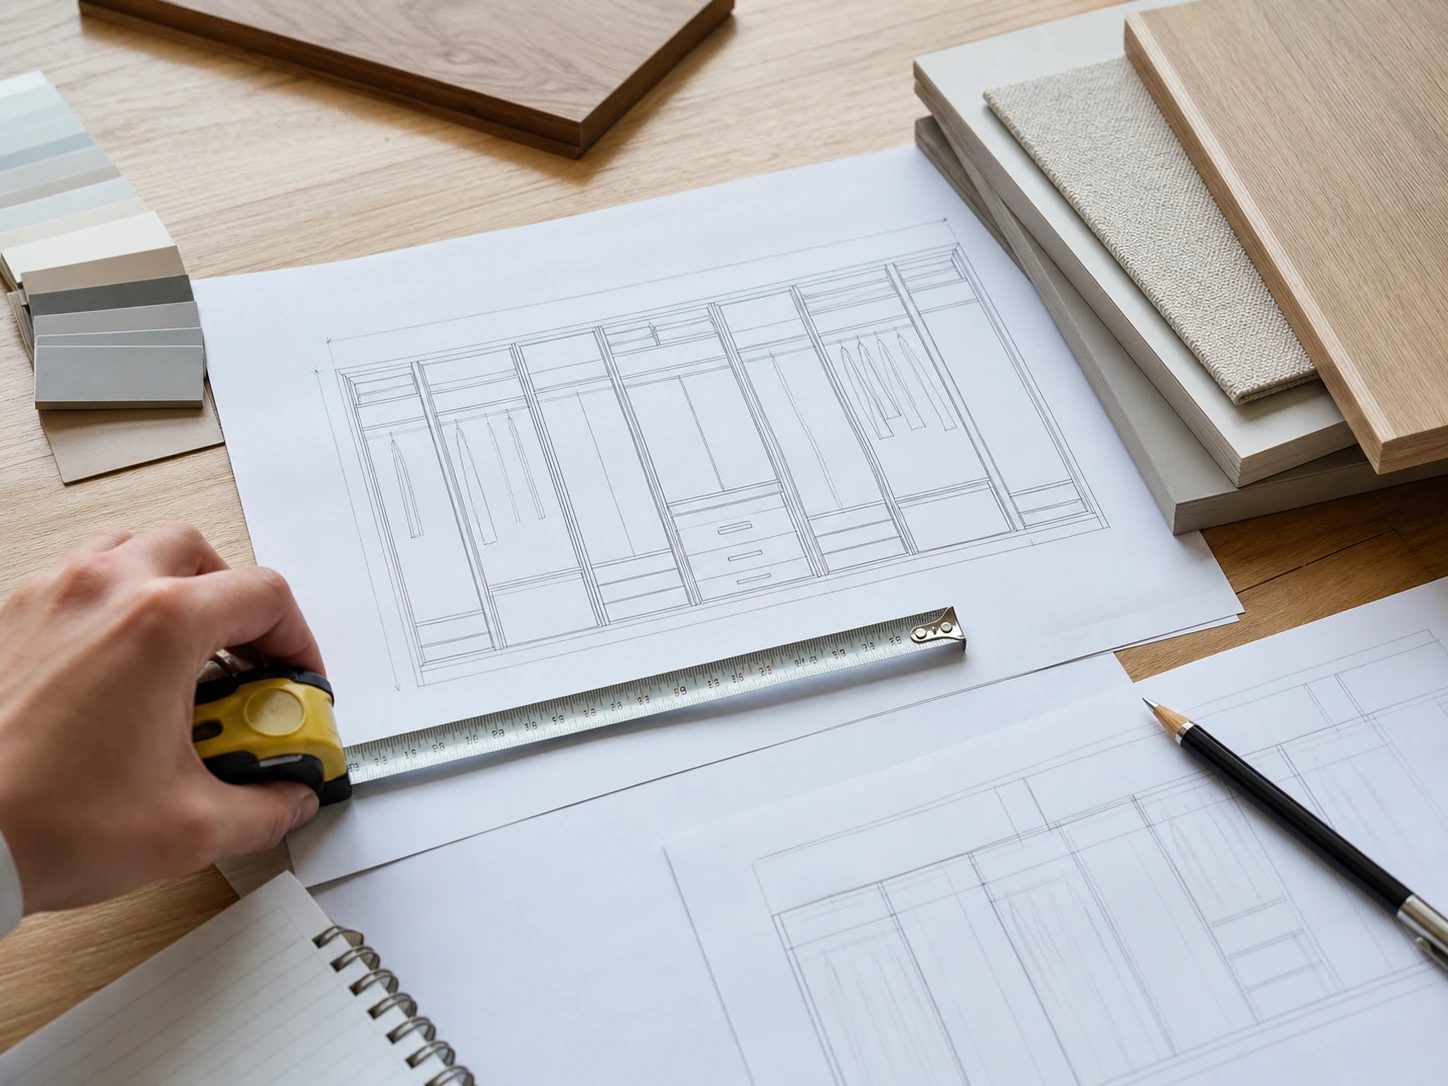
Check the Drawings Before Production
The drawing stage is where fitted wardrobe design planning becomes concrete. A buyer should not approve a fitted wardrobe only because the front elevation looks balanced.
Front elevation is not enough for a fitted wardrobe
The front elevation shows door rhythm, panel proportions and visible style. It does not fully show the internal storage plan. A wardrobe can look beautiful from the front and still hide poorly placed drawers or hanging sections.
Internal elevation, sections and installation notes should show the real storage plan
Internal elevations should show long hanging, short hanging, shelves, drawers and upper storage. Sections should clarify depth, panel thickness and any special details. Installation notes should identify wall conditions, filler panels, socket locations, skirting issues and other site constraints.
For a custom supplier, these drawings help align the buyer’s expectations with production. For the buyer, they provide a final chance to check whether daily use has been planned correctly.
Overseas buyers should prepare floor plans, site photos and measurement notes
When a fitted wardrobe is planned remotely, communication becomes even more important. Floor plans, room photos, wall measurements, ceiling height, socket locations and notes about skirting or uneven walls can help the design team prepare more accurate drawings.
Clear information at the beginning is usually easier than correcting assumptions later.
What to Prepare Before Asking for a Custom Fitted Wardrobe Quote
Before requesting a quote, prepare information that helps the supplier understand both the room and the storage behavior.
Room dimensions, wall photos and ceiling details
Measure wall width, ceiling height and any return walls or recesses. Take photos of the wall, floor, ceiling, sockets, skirting and nearby doors or windows. If the ceiling is not level or the wall is not flat, mention it early.
Clothing inventory and storage priorities
Share whether the wardrobe needs more long hanging, short hanging, drawers, shelves, accessory trays, luggage space or upper storage. If two people share the wardrobe, note whether their storage needs should be separated.
Preferred finish direction after the layout is confirmed
After the internal plan is practical, choose the visual direction. This may include linen texture panels, matte painted panels, mirror sections, framed doors, leather pulls or other handle details. The finish conversation becomes easier when the storage plan is already clear.
FAQs About Fitted Wardrobe Design Planning
What should be planned first in a fitted wardrobe?
Plan clothing volume and storage behavior first. Long hanging, short hanging, drawers, shelves, seasonal storage and daily access should guide the cabinet zones before the exterior style is finalized.
How deep should a fitted wardrobe be?
The correct depth depends on hanger size, door type, internal accessories and room conditions. Usable internal depth matters more than only the outside cabinet depth, so it should be checked in the drawings.
Should I choose wardrobe doors before the internal layout?
It is better to confirm the internal layout first. Door type affects access and clearance, so it should follow the storage plan rather than control it too early.
Are linen finish wardrobe doors suitable for bedrooms?
Linen finish panels can work well in bedrooms when the design needs a softer surface texture than painted or wood-look panels. They should still be selected after the layout, depth and door access are confirmed.
What drawings are needed before ordering a fitted wardrobe?
At minimum, review the front elevation, internal elevation, sections and installation notes. These drawings should show storage zones, depth, door details, site conditions and any filler or installation requirements.
Final Thoughts
Good fitted wardrobe design planning is not only about choosing a beautiful door. It is about turning clothing habits, room dimensions and site conditions into a cabinet that works every day.
Start with storage. Confirm the usable depth, height, wall conditions and access. Then choose doors, finishes, handles and lighting that support the plan. Before production, check the drawings carefully, especially the internal elevation and installation notes.
If you are preparing a custom fitted wardrobe project, gather room dimensions, wall photos, ceiling details, clothing storage priorities and preferred finish direction before requesting a layout review. That information gives the design team a clearer starting point and helps the final wardrobe feel calm on the outside and practical on the inside.