English
  日本語
日本語  العربية
  Deutsch
  Español
  Français
  한국어
한국어  Português
  Татар теле
  Русский
 Whole house cabinetry planning should start before detailed drawings begin because a floor plan is only the beginning of a cabinet project. It can show where the kitchen, wardrobes, vanity, TV wall, sideboard, entrance cabinet, or laundry storage may sit, but it does not explain what each cabinet must store, which appliance models affect openings, which finishes should connect across rooms, or who must verify site dimensions before production.
For an overseas home, villa, apartment, or project buyer, the useful first step is to turn the floor plan into a cabinet-ready brief. That brief gives the designer, manufacturer, contractor, and installer the same reference point before quotation, shop drawings, material confirmation, and production.

Why Whole House Cabinetry Planning Must Start Before Drawings
Drawings become much more reliable when the cabinet brief is clear first. If the drawing team only receives a floor plan and a few style references, important decisions may be treated as assumptions: cabinet depth, storage purpose, appliance dimensions, glass doors, lighting, fillers, skirting, ceiling junctions, or opening directions. Those assumptions can affect quotation accuracy and production details later.
Starting with the brief does not mean every detail must be final on day one. It means confirmed information, pending decisions, and open questions are visible before the drawing work becomes too detailed.
A Floor Plan Shows Positions, Not Cabinet Decisions
A floor plan shows room boundaries, walls, openings, and circulation. It may also show where fixed kitchen or wardrobe areas are expected. What it usually does not show is how deep each cabinet should be, which wall cabinet doors may conflict with a window, where a tall appliance column needs ventilation, or whether a living room display cabinet needs cable access and lighting.
For a whole-home cabinet package, these missing decisions matter. The kitchen may need appliance openings and countertop landing space. Bedroom wardrobes may need hanging zones, drawers, luggage storage, and lighting. Entrance cabinets may need shoes, coats, bags, cleaning tools, and a place for daily items. A floor plan can locate these areas, but it cannot replace a cabinet brief.
Separate Confirmed Information from Assumptions
Before drawings begin, label information as confirmed, pending, or assumed. Confirmed items may include wall dimensions, ceiling height, appliance models, preferred finish direction, or required storage purpose. Pending items may include exact socket positions, final countertop material, handle choice, or site measurement. Assumed items should remain visible until someone confirms them.
This simple separation protects the project. It prevents placeholder dimensions or early design preferences from becoming production information without review.
Map Daily Routines Before Naming Cabinet Modules
Room names are too broad for cabinet planning. “Kitchen,” “living room,” and “bedroom” tell the manufacturer where cabinets might go, but not how the household will use them. A better brief starts with daily routines, then turns those routines into cabinet modules.
Arrival, Cooking, Cleaning, Dressing, and Display
Arrival routines may require shoe storage, coat hanging, keys, bags, and a small bench. Cooking routines may require pantry storage, appliance access, preparation space, waste sorting, ventilation, and cleaning supplies. Dressing routines may require long hanging, short hanging, drawers, open shelves, mirror placement, and soft lighting. Display routines may need glass doors, open niches, or lighting, but only where dust, maintenance, and daily access make sense.
When these routines are listed early, the cabinet plan becomes more specific. The discussion moves from “we need cabinets in this room” to “this wall needs tall pantry storage, appliance access, and a practical landing area.”
Decide Which Functions Connect Across Rooms
Whole-house cabinetry often works across room boundaries. The kitchen may connect to a dining sideboard, beverage zone, or living room storage wall. The entrance cabinet may connect to cleaning supplies or hallway display. Bedroom wardrobes may connect to dressing tables, linen storage, or luggage storage.
These connections affect material continuity and cabinet depth. They also help decide where open shelves, glass doors, closed storage, lighting, and drawers belong. The goal is not to make every room identical, but to make the home feel planned.
Build a Room-by-Room Cabinetry Schedule
A room-by-room schedule is the practical bridge between the floor plan and the drawing package. It records each cabinet zone, its function, known measurements, equipment, and unresolved decisions. For whole house cabinetry planning, this schedule is often more useful than a mood board because it shows what information is still missing before drawings begin.
| Room or Zone | Cabinet Purpose | Required Inputs Before Drawings | Quotation Impact |
|---|---|---|---|
| Kitchen | Cooking, pantry, appliance integration, countertop work | Appliance models, plumbing, sockets, ventilation, countertop direction | Cabinet carcass, hardware, openings, countertop, lighting |
| Dining and Living | Sideboard, TV wall, display, concealed storage | Wall lengths, TV size, cable routes, display needs, lighting | Glass, lighting, open shelves, door finish, hardware |
| Bedrooms | Wardrobes, dressing, linen, luggage storage | Ceiling height, door swing, wardrobe contents, drawer needs | Door system, internal accessories, lighting, handles |
| Entrance and Utility | Shoes, coats, cleaning tools, daily drop zone | Traffic path, bench need, socket position, wet item storage | Ventilation gaps, durable panels, open niches, hardware |
Record Dimensions, Storage Purpose, and Equipment
The schedule should include wall dimensions, ceiling height, cabinet depth expectations, storage purpose, equipment models, hardware preferences, lighting requirements, and finish direction. If measurements come from the original floor plan rather than a site check, mark them clearly.
It is also useful to note what should be easy to reach and what can be stored higher or deeper. Frequently used cooking items, shoes, daily bags, and everyday clothing need different access than seasonal luggage, display objects, or spare linens.
Mark What Affects Quotation Accuracy
Some decisions affect quotation more than others. Door material, cabinet carcass specification, countertop type, glass doors, lighting, drawer systems, tall pull-outs, special hinges, and integrated appliances can change the cost and production detail. If these decisions are still pending, the quotation should say so.
This does not make the process more complicated. It makes the project more honest. A quotation based on visible pending decisions is easier to revise than a quotation that hides assumptions.
Coordinate Materials Before Every Room Becomes a Separate Decision
Material coordination should happen before each room becomes an isolated design decision. A whole-home project can use one leading material family while changing the proportion of that material from room to room. This keeps the house coordinated without forcing every cabinet surface to look the same.
Choose One Leading Material Family
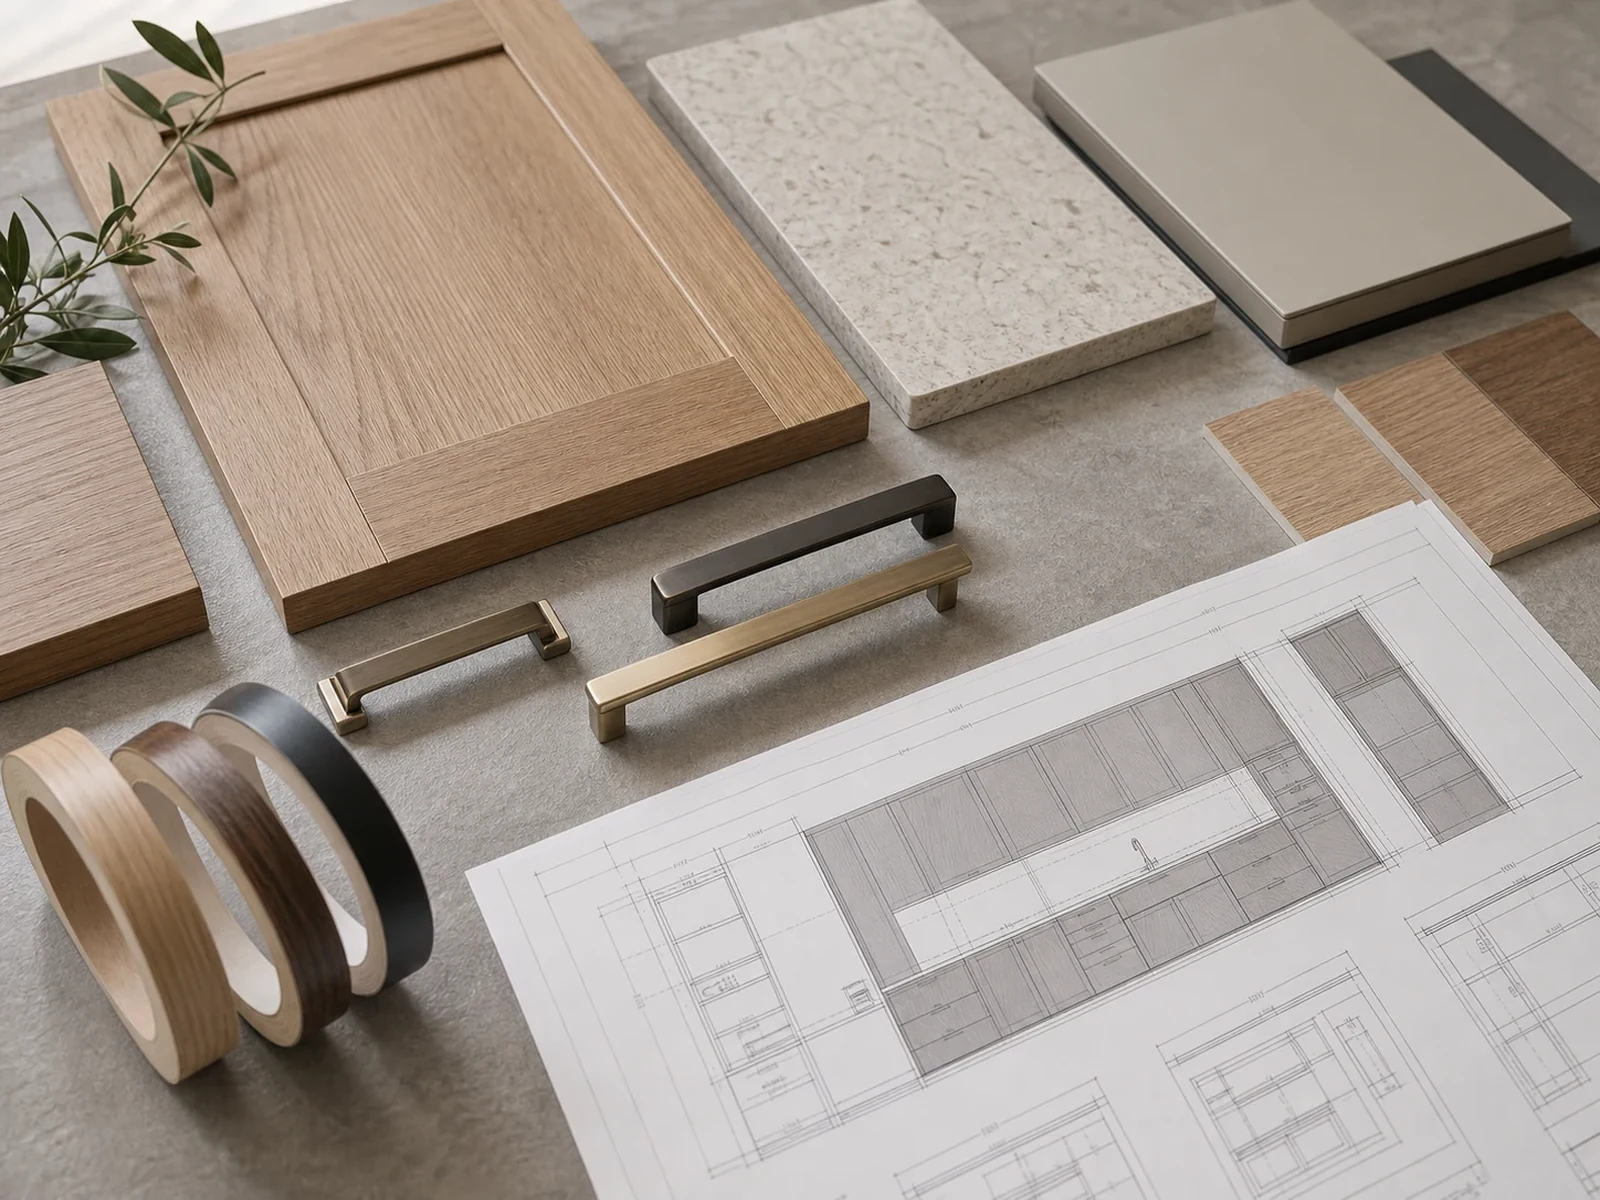
For a natural oak direction, oak can serve as the leading finish language across the home. In practice, the final material should still be confirmed through physical samples and approved drawings. “Natural oak” may refer to an approved oak-tone finish, veneer, panel, or project-specific material selection; it should not be treated as a solid-wood construction claim unless the specification confirms it.
The leading material family gives the home a visual anchor. The kitchen may carry the strongest oak presence because it is visible and technically detailed. Dining, living, bedroom, and entrance storage can then repeat the same language in different proportions.
Change Material Proportions by Room
The kitchen may combine natural oak fronts with restrained solid-color panels and pale stone. Dining and living storage may use oak as a frame, open shelf, back panel, or selected door group so the space feels lighter. Bedroom wardrobes may reduce contrast and use oak more quietly through accents, niches, or selected panels.
For a product example, Sunrise Furnishing’s coordinated natural oak cabinetry across the home shows how one oak direction can be planned without making every room identical.
Bring Appliances and Utilities into the Brief Early
Appliances and utilities are not late-stage technical details. They affect cabinet openings, ventilation, heat clearance, socket access, plumbing routes, maintenance space, countertop layout, and sometimes door direction. If appliance and utility information enters the project too late, drawings may need revision after the cabinet logic has already been built.
Appliance Models Affect Cabinet Openings
Built-in refrigerators, ovens, microwaves, dishwashers, wine coolers, washer-dryer units, hobs, hoods, and sinks all need specific information. The drawing should confirm opening size, panel relationship, handle clearance, ventilation, heat clearance, and access for service.
If the appliance model is not final, the drawing should not pretend that the opening is final. It can use a placeholder, but that placeholder should be clearly marked until the buyer or project team confirms the model.
Plumbing, Sockets, Ventilation, and Maintenance Access
A cabinet can look correct in front elevation while blocking a shutoff valve, socket, duct route, or cable access point. Plumbing below sinks, sockets behind appliances, ventilation above cooking zones, and access panels behind equipment should be reviewed before production drawings are approved.
For overseas projects, marked drawings, site photos, and short videos can help the manufacturer understand utility positions that may not be clear from the floor plan alone.
Review Drawings for Production Details, Not Just Appearance
Drawing review should confirm more than visual balance. A good whole-home drawing review checks whether the cabinet plan can be produced, delivered, installed, opened, maintained, and used in the actual room.
Plans, Elevations, and Sections
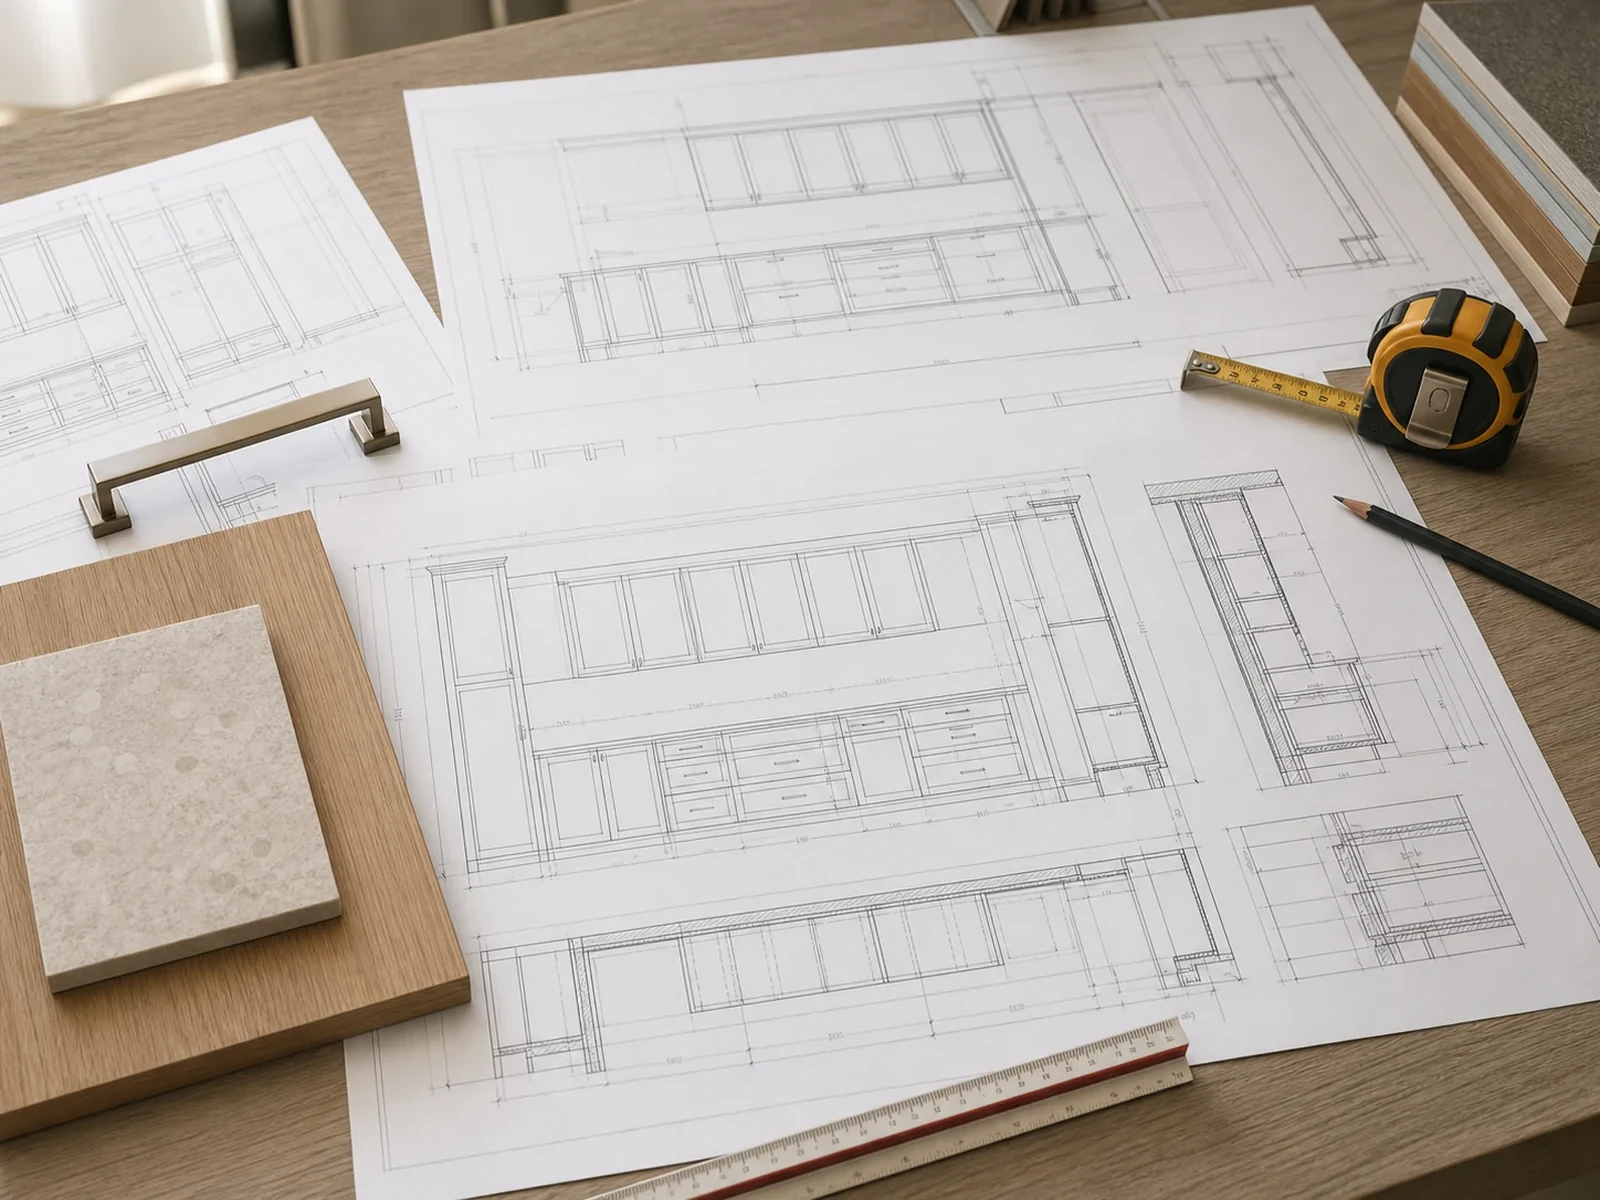
The plan view confirms cabinet position, depth, circulation, appliance layout, and relationship to walls or islands. Elevations confirm door sizes, drawer divisions, wall cabinet height, open niches, display areas, and visual rhythm. Sections confirm cabinet depth, countertop thickness, toe kick or skirting, ceiling junctions, wall panels, and internal relationships that a front view cannot show.
These drawing types should agree with one another. If a tall cabinet looks correct in elevation but conflicts with ceiling height or a service route in section, the issue should be resolved before production.
Fillers, Skirting, Ceiling Junctions, and Opening Directions
Small junctions often decide whether installation feels controlled. Fillers help absorb wall variation and allow doors or drawers to open beside walls. Skirting and toe kicks affect cleaning, shadow lines, and installation tolerance. Ceiling junctions affect how tall cabinets meet bulkheads, suspended ceilings, or uneven site conditions.
Opening directions also need review. A drawer should not collide with an appliance door. A wardrobe door should not block a narrow passage. A wall cabinet door should not fight a window, pendant light, or hood position.
Project coordination note: final dimensions and specifications should depend on approved drawings and verified site information. Early floor plans, sample references, or mood boards should not be treated as production-ready documents.
Divide Responsibility Before Production Starts
A whole-home cabinet package involves several parties. The buyer, designer, site contractor, installer, and manufacturer may each control different information. If responsibility is unclear, a missing measurement or utility detail can become a production problem.
Site Measurement and Utility Confirmation
Site measurement should confirm wall length, ceiling height, floor level, wall flatness, window and door positions, pipe locations, socket locations, and ceiling conditions. Utility confirmation should identify whether plumbing, electrical, ventilation, and appliance services are fixed or still adjustable.
The manufacturer can prepare drawings from supplied information, but the project team should be clear about who verifies the site. For overseas projects, this responsibility should be agreed before the drawing set is approved.
Delivery Routes and Installation Conditions
Delivery access matters for tall units, large panels, countertops, glass doors, and fragile finishes. Check lift size, stair turns, corridor width, entry door width, loading rules, and site storage. Long panels or countertop pieces may need special planning.
These checks do not need to become promises about every building condition. They are practical risk controls that help the buyer, installer, and manufacturer understand the project before production.
Revision Records and Final Approval
Every revision should have a clear record. If an appliance model changes, if a wall measurement is corrected, if a finish is replaced, or if a cabinet opening is adjusted, the drawings and quotation notes should be updated together. The approved drawing version should be easy to identify before production starts.
Without this record, different parties may work from different versions of the project. That is one of the easiest ways for a whole-home cabinet package to become difficult to manage.
Final Pre-Drawing Checklist
Before detailed drawings begin, review the brief one more time:
- Room functions are matched to cabinet zones.
- Site dimensions are verified or clearly marked as pending.
- Appliance models and openings are confirmed or marked as placeholders.
- Sockets, plumbing, ventilation, and maintenance access are reviewed.
- Materials, samples, edge details, glass, hardware, and lighting choices are approved or listed as pending.
- Plans, elevations, sections, fillers, skirting, ceiling junctions, and opening directions are included in the drawing scope.
- Delivery route and installation responsibilities are recorded.
- Drawing version, quotation notes, and material decisions are aligned.
This checklist gives the drawing team a better starting point. It also helps the buyer understand which decisions are still open before the project moves toward production.
Frequently Asked Questions
What information is needed before whole house cabinetry drawings begin?
Prepare the floor plan, room measurements, ceiling heights, site photos, appliance model information, plumbing and electrical positions, storage requirements, finish direction, hardware preferences, and any installation constraints. If some details are not confirmed, mark them as pending rather than treating them as final.
Should every room use the same cabinet finish?
No. A whole-home project can use one leading material family, such as a natural oak direction, while changing the amount of oak, solid color, stone, glass, or metal by room. This keeps the home coordinated without making every cabinet wall identical.
When should appliance models be confirmed?
Appliance models should be confirmed before production drawings are approved. Exact models affect cabinet openings, ventilation, heat clearance, socket access, door movement, and service space. If models are not final, the drawings should use clearly marked placeholder dimensions.
Who is responsible for site measurement before production?
Responsibility should be agreed before production. In many overseas projects, the local site team verifies measurements and utilities, while the manufacturer uses the confirmed information to prepare drawings and production details. The approved drawing set should record which dimensions have been verified.
Practical Closing
Whole house cabinetry planning before drawings begin is not an extra design step. It is the point where room functions, measurements, materials, appliances, utilities, drawing checks, and responsibilities become clear enough for the next stage. A coordinated brief helps the drawing team work more accurately, gives the buyer a clearer quotation basis, and gives production fewer unresolved assumptions.
If you are preparing a whole-house custom furniture project, Sunrise Furnishing can review floor plans, room schedules, appliance information, finish direction, and site notes before the cabinetry drawings move toward approval.